


Starting Seeds Indoors
Why Start Early?
It's fun to experience the whole growing cycle as you watch baby seedlings grow into sturdy plants that bear delicious fruit. We often need to give plants a critical head start by germinating and growing seedlings in the warm indoors in early spring. Then when it warms up outdoors in late spring, we can plant out sturdy, well-established seedlings to bear fruit before cold weather sets in. Favorites like tomatoes and peppers are both plants that need a long warm growing period to set and ripen a good crop. Except in the most tropical areas, all U.S. summers are too short for them to complete their fruiting cycles before summers end if started directly in the ground, since seeds wont germinate until frosts have ended and weather warms up.
When to Sow Seed Indoors
Generally, the time to start your seeds is about 8 weeks before the last expected spring frost date in your area, planting the seedlings outdoors about 2 weeks after that date. Another way to figure is to plan on setting out sturdy seedlings in the garden when night temperatures stay in the mid-50 degree range both day and night. Count back and sow seeds 6 to 8 weeks before that date normally arrives. If you don't feel confident about timing, consult an experienced gardening friend, or ask at a good garden center or seek the advice of your local Master Gardener program (usually available through the University Co-op Extension Service in your area.)
Getting Started
Your planting containers should be at least three inches deep, with small holes for drainage. You can use plastic yogurt or cottage cheese containers, 3 or 4 inch plastic plant pots or half-gallon milk cartons cut lengthwise, all with drainage holes punched in the bottoms. I don't recommend reusing egg cartons or old nursery packs as they don't hold enough soil volume and dry out too easily. Buy and use a good quality seed starting mix, available from any good nursery or garden center. (Ordinary garden soil is not a good choice, as it often contains weed seeds and fungus organisms and it compacts far too easily.) Seed starting mixes are sterile and blended to be light and porous so your fragile seedlings get both the moisture and oxygen they need to thrive.
In a big bucket, add water slowly to the seed starting mix and combine well. You want it to be thoroughly moistened but not soggy - about the consistency of a wrung-out sponge throughout before you fill your containers. Fill each container to an inch below the top and tap it on the tabletop to settle the mix. Use a plastic or wooden marker with the variety name and sowing date and slide it into the container. With the side of a pencil or chopstick, make a seed furrow about 1/4 inch deep and carefully drop in individual seeds about an inch apart. Sift some more starting mix between your hands to fill the furrows and firm gently to be sure the seeds have good contact. Use a spray bottle to water the seeds in with a fine mist.
Germinating and Growing
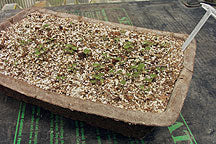 Many warm weather plants like peppers and tomatoes need 80 to 85 degree conditions to start germinating. Put the containers in a warm place where they'll get bottom heat, such as on top of the water heater or refrigerator. Keep the container moist, but not soggy. You can cover it with plastic wrap or an old piece of rigid clear plastic to conserve moisture if you like, but be sure to pull it up to check daily to be sure they aren't drying out. Water as necessary with a very gentle spray of water. If container should get too dry, you'll need to set it in a pan of water so it can soak up water again from below. Expect germination to take 5 to 10 days for tomatoes and 5 to 14 days for peppers. (Don't keep your containers in the windowsill during the germination period; cold air at night will affect germination.) Check often! Just as soon as any baby seedlings begin to emerge above the soil level, its critical to give them light right away. Remove any covering immediately and provide a strong light source. While a south-facing windowsill is traditional, its far from ideal. I like to start my containers from the beginning under grow lights or a fluorescent shop light suspended from chains with cup hooks so I can move the lights up as the plants grow. Suspend the light just 1 or 2 inches above the seedlings and it will provide both light and warmth. (Once germinated, seedlings will grow happily at 70 - 80 degrees.
 As the seedlings grow, move the lights up, keeping them just a few inches above the tops of the plants. If you do use a sunny windowsill to grow your seedlings, rotate the plants every few days so they don't have to reach for the light. Seedlings that are stringy looking, weak or pale are not getting enough light. There should be no more than an inch of stem between the surface of the soil and the first little leaf. I generally leave artificial lights on for 12 to 16 hours a day; I've also left them on 24 hours a day with equally good results. With warm conditions and enough light, seedlings will grow rapidly. Their first two oval leaves will soon be succeeded by sets of true leaves. At this point, its okay to let the top 1/2 inch of soil dry out between watering. Check soil moisture by putting your index finger into the soil - if its dry below your first joint, its time to water carefully with a gentle trickle from faucet or watering can.
Pricking Out and Potting Up
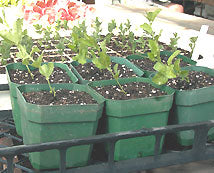
When seedlings are 2 to 3 inches tall and have several sets of true leaves, its time to move them to deeper containers or individual pots so they have room to grow. Fill the new containers with pre-moistened mix. With the help of a fork thrust to the bottom, lift the seedlings gently from your germinating container. Try to get all the roots and disturb them as little as possible. Make a planting hole in the new container and nestle the seedling into its new home a little deeper than it was originally. If your tomato plants are spindly with long stems, you can actually bury the stems right up to the topmost cluster of leaves and new roots will grow along the buried stems. Gently press the mix around the transplanted seedlings and water them gently to settle the soil. Now is the time to begin feeding your plants once a week because starting mixes contain little if any plant food and the seedlings will have used up the entire stored food source available in its mother seed. Use a good liquid fertilizer or fish emulsion diluted to half normal recommended strength. Continue to give your rapidly growing seedlings as much light as possible and rotate them regularly so they grow evenly and don't lean in one direction.
Planting Seedlings in the Garden
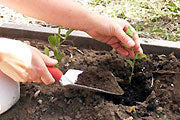 In 3 or 4 weeks, or when the weather outdoors has warmed into the 50 degree range at night, its time to harden off or gradually acclimate your seedlings to outdoor conditions. Put them outside in a protected shady spot for a half day at first, then 2 or 3 full days, then gradually move them into full sun, starting with mornings then all day long. Plan to transplant into the garden in the late afternoon or on a hazy or cloudy day to minimize stress. Firm the soil around the plants and water well. Keep your young plants moist but not soggy. I like to mulch them with a good thick layer of compost, well-aged manure, straw or other organic material. This will provide the even moisture balance needed for healthy, disease-free growth and early big fruit sets, and will also discourage weeds.
When to Sow Seed Indoors
Generally, the time to start your seeds is about 8 weeks before the last expected spring frost date in your area, planting the seedlings outdoors about 2 weeks after that date. Another way to figure is to plan on setting out sturdy seedlings in the garden when night temperatures stay in the mid-50 degree range both day and night. Count back and sow seeds 6 to 8 weeks before that date normally arrives. If you don't feel confident about timing, consult an experienced gardening friend, or ask at a good garden center or seek the advice of your local Master Gardener program (usually available through the University Co-op Extension Service in your area.)
Getting Started
Your planting containers should be at least three inches deep, with small holes for drainage. You can use plastic yogurt or cottage cheese containers, 3 or 4 inch plastic plant pots or half-gallon milk cartons cut lengthwise, all with drainage holes punched in the bottoms. I don't recommend reusing egg cartons or old nursery packs as they don't hold enough soil volume and dry out too easily. Buy and use a good quality seed starting mix, available from any good nursery or garden center. (Ordinary garden soil is not a good choice, as it often contains weed seeds and fungus organisms and it compacts far too easily.) Seed starting mixes are sterile and blended to be light and porous so your fragile seedlings get both the moisture and oxygen they need to thrive.
In a big bucket, add water slowly to the seed starting mix and combine well. You want it to be thoroughly moistened but not soggy - about the consistency of a wrung-out sponge throughout before you fill your containers. Fill each container to an inch below the top and tap it on the tabletop to settle the mix. Use a plastic or wooden marker with the variety name and sowing date and slide it into the container. With the side of a pencil or chopstick, make a seed furrow about 1/4 inch deep and carefully drop in individual seeds about an inch apart. Sift some more starting mix between your hands to fill the furrows and firm gently to be sure the seeds have good contact. Use a spray bottle to water the seeds in with a fine mist.
Germinating and Growing
Many warm weather plants like peppers and tomatoes need 80 to 85 degree conditions to start germinating. Put the containers in a warm place where they'll get bottom heat, such as on top of the water heater or refrigerator. Keep the container moist, but not soggy. You can cover it with plastic wrap or an old piece of rigid clear plastic to conserve moisture if you like, but be sure to pull it up to check daily to be sure they aren't drying out. Water as necessary with a very gentle spray of water. If container should get too dry, you'll need to set it in a pan of water so it can soak up water again from below. Expect germination to take 5 to 10 days for tomatoes and 5 to 14 days for peppers. (Don't keep your containers in the windowsill during the germination period; cold air at night will affect germination.) Check often! Just as soon as any baby seedlings begin to emerge above the soil level, its critical to give them light right away. Remove any covering immediately and provide a strong light source. While a south-facing windowsill is traditional, its far from ideal. I like to start my containers from the beginning under grow lights or a fluorescent shop light suspended from chains with cup hooks so I can move the lights up as the plants grow. Suspend the light just 1 or 2 inches above the seedlings and it will provide both light and warmth. (Once germinated, seedlings will grow happily at 70 - 80 degrees.
As the seedlings grow, move the lights up, keeping them just a few inches above the tops of the plants. If you do use a sunny windowsill to grow your seedlings, rotate the plants every few days so they don't have to reach for the light. Seedlings that are stringy looking, weak or pale are not getting enough light. There should be no more than an inch of stem between the surface of the soil and the first little leaf. I generally leave artificial lights on for 12 to 16 hours a day; I've also left them on 24 hours a day with equally good results. With warm conditions and enough light, seedlings will grow rapidly. Their first two oval leaves will soon be succeeded by sets of true leaves. At this point, its okay to let the top 1/2 inch of soil dry out between watering. Check soil moisture by putting your index finger into the soil - if its dry below your first joint, its time to water carefully with a gentle trickle from faucet or watering can.
Pricking Out and Potting Up
When seedlings are 2 to 3 inches tall and have several sets of true leaves, its time to move them to deeper containers or individual pots so they have room to grow. Fill the new containers with pre-moistened mix. With the help of a fork thrust to the bottom, lift the seedlings gently from your germinating container. Try to get all the roots and disturb them as little as possible. Make a planting hole in the new container and nestle the seedling into its new home a little deeper than it was originally. If your tomato plants are spindly with long stems, you can actually bury the stems right up to the topmost cluster of leaves and new roots will grow along the buried stems. Gently press the mix around the transplanted seedlings and water them gently to settle the soil. Now is the time to begin feeding your plants once a week because starting mixes contain little if any plant food and the seedlings will have used up the entire stored food source available in its mother seed. Use a good liquid fertilizer or fish emulsion diluted to half normal recommended strength. Continue to give your rapidly growing seedlings as much light as possible and rotate them regularly so they grow evenly and don't lean in one direction.
Planting Seedlings in the Garden
In 3 or 4 weeks, or when the weather outdoors has warmed into the 50 degree range at night, its time to harden off or gradually acclimate your seedlings to outdoor conditions. Put them outside in a protected shady spot for a half day at first, then 2 or 3 full days, then gradually move them into full sun, starting with mornings then all day long. Plan to transplant into the garden in the late afternoon or on a hazy or cloudy day to minimize stress. Firm the soil around the plants and water well. Keep your young plants moist but not soggy. I like to mulch them with a good thick layer of compost, well-aged manure, straw or other organic material. This will provide the even moisture balance needed for healthy, disease-free growth and early big fruit sets, and will also discourage weeds.